
Goal: To launch a sales campaign on both Facebook and Instagram.
Ideal Outcome: Your sales campaign runs on both Facebook and Instagram.
Prerequisites or Requirements:
You need a Meta Ads Account and a Business Page.
You need to have the Meta pixel on your website if your performance goal is to maximize the number of conversions which takes place at your website. Skip to ‘Performance goal’ to know more.
Why this is important: A sales campaign advertisement on both Facebook and Instagram could increase revenue and brand awareness.
Where this is done: In Meta Ads Manager.
When this is done: Every time you wish to advertise a sales campaign on Facebook and Instagram.
Who does this: The person responsible for Paid Advertising.
Setting up a Campaign
Creating and naming the sales campaign
Log into your Ads Manager guided creation panel here.
If you’re managing multiple Ad Accounts and Business Managers, ensure you’ve selected the right ones on the top header.
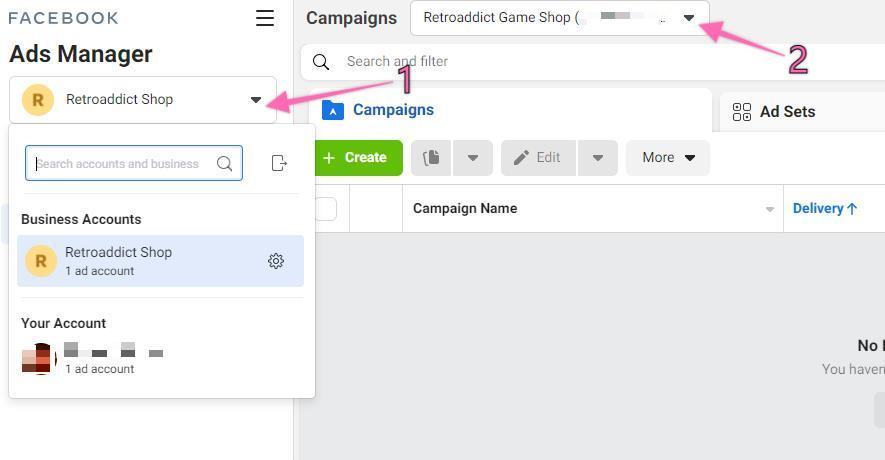
Note: Your Meta Manager Campaign main dashboard has 3 tabs: Campaigns, Ad Sets, and Ads Tab:

Click the ‘+ Create’ button under the ‘Campaigns’ tab:
To choose a campaign, you can do the following based on your experience.
You can identify the new objective using your previous knowledge if you're familiar with the previous objective layout. Click on the drop-down and select the objective.
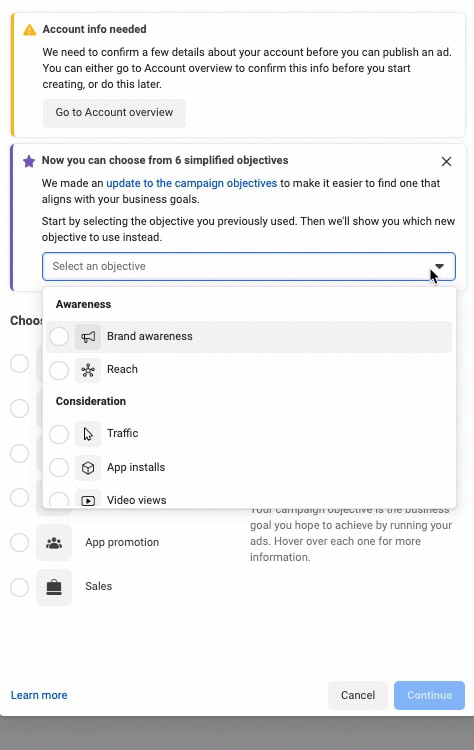
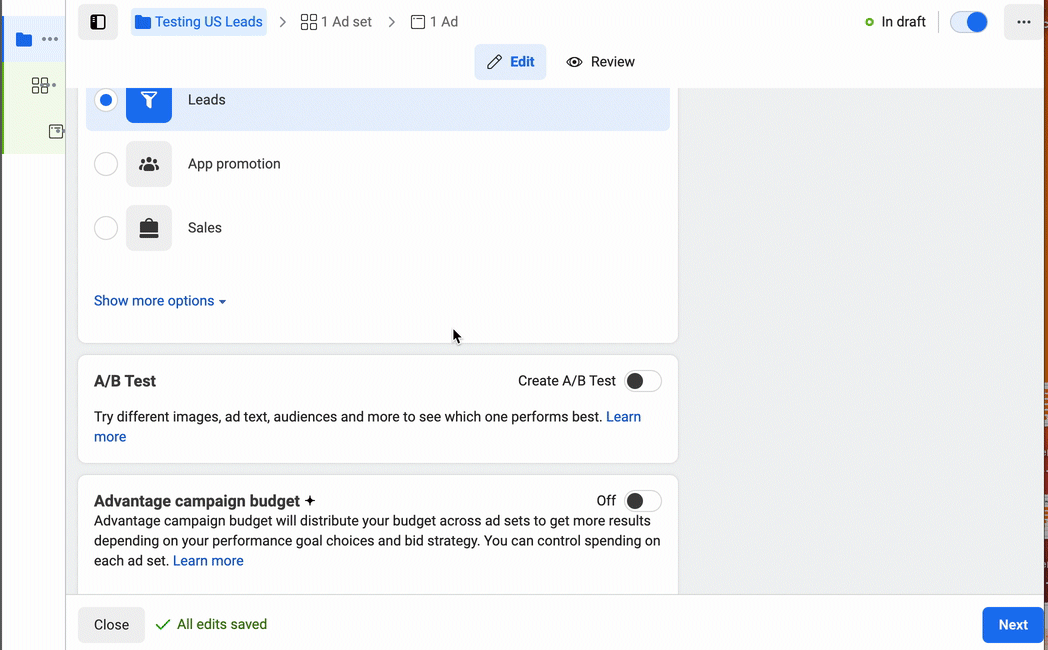
If you have no experience with campaign objectives, you will see a list of 6 objectives under ‘Choose a campaign objective’. Choose ‘Sales’.
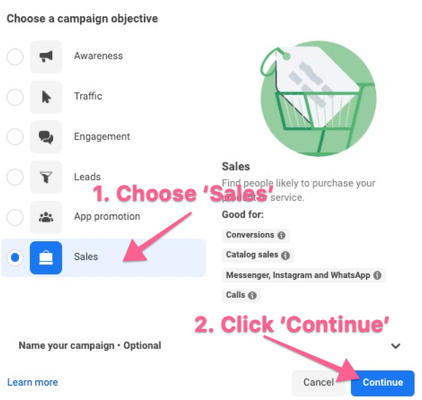
Name your campaign according to your naming convention. You must declare whether your ads are related to credit, employment, housing, social issues, elections, or politics.

Setting up the campaign budget
Note: It’s best if you already have the number of Ad Set to build before deciding the method to set up the campaign budget. You can move on to explore Setting up an Ad Set Setup first if you like and refer back here again to set up your budget.
You need to decide first if you need Meta to help you to distribute your overall budget according to your ad set performance, or if you prefer to set the limit yourself.
If you prefer to set an overall campaign spending limit and ad set spend yourself, scroll down until you see ‘Show more options’ in blue under ‘Campaign objective’. Click on it and tick the box ‘Add campaign spending limit’. Enter the amount in the box. You must enter a higher amount if the red error prompt ⚠️ appears.
Note: This amount limit covers all of your ad sets created under the campaign. The campaign will stop once the spending limit is reached.
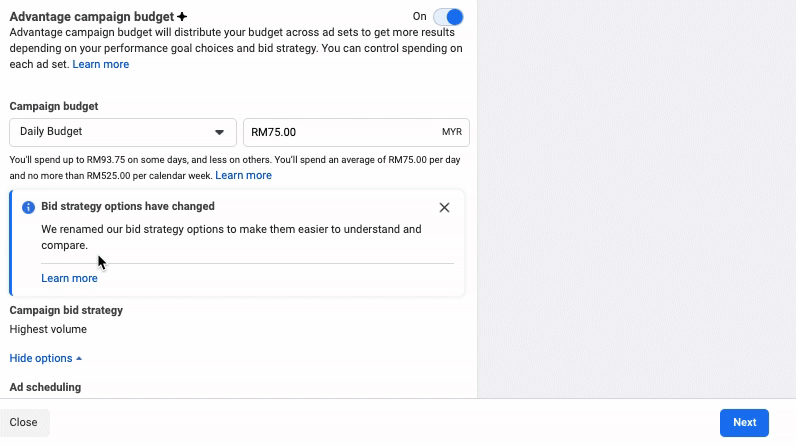
If you need Meta to help you to distribute your overall budget according to your ad set performance, scroll down until you see ‘Advantage campaign budget’. On the right of ‘Advantage campaign budget’, turn ‘ON’ until it turns ‘blue’ (it is OFF by default)
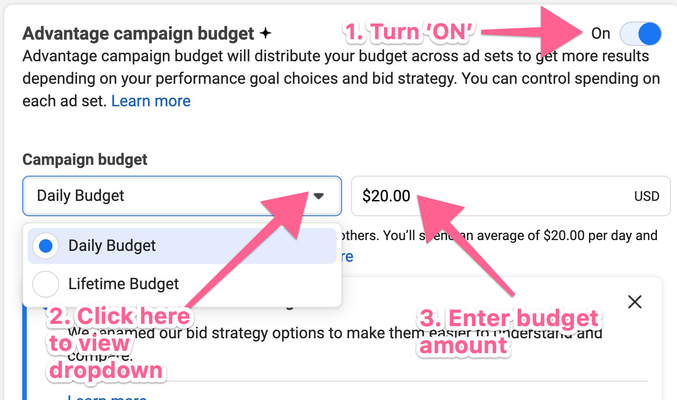
Select ‘Daily Budget’ in Campaign budget if you want an ongoing campaign.
Example: If you want to spend $20 per day on this campaign, you will have a ‘Daily Budget: $20’.Select ‘Lifetime Budget’ if you want to limit your campaign to a specific budget instead.
Note 1: If you only have one campaign (which is the case if you follow these instructions from beginning to end), this will be how much you’re willing to spend on this campaign.
Note 2: If you select ‘Lifetime Budget’, your ‘Add campaign spending limit’ settings will disappear because you only need to choose one between them.
Important: You can’t change this after your Ads are running; You can always duplicate your campaign, but you should avoid that if possible.
Setting up campaign bid strategy
Scroll down to the furthest and see ‘Campaign bid strategy.’ Click on the drop-down button.

You will see options appear, and you need to decide the best strategy for your campaign.
Note: Bid strategy options will appear based on your ‘Campaign Budget’ strategy and amount. You can read more about it here.
‘Highest Volume’ when you wish to maximize delivery and conversions from your budget.
‘Cost per result goal’ when you focus on keeping the cost around the cost amount regardless of market conditions.
‘Bid Cap’ when you want to set the maximum bid across auctions rather than allowing Facebook to bid automatically. Bid cap is meant for advertisers who strongly understand predicted conversion rates and can calculate the right bid.
Allowing Ad scheduling in a campaign
Note 1: This section allows you to have the option to schedule your Ads according to your preferred day and time. You can skip to Setting up an Ad Set if you do not need it.
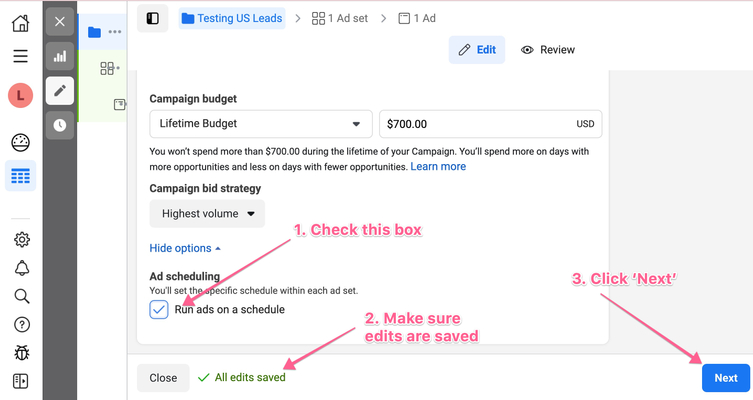
Note 2: You can only run ‘Ad Scheduling’ if you have chosen ‘Lifetime Budget’ in the ‘Campaign Budget’ dropdown.
Scroll down to the furthest and see ‘Ad scheduling’. Hover over the right to reveal the hidden ‘Edit’ icon.
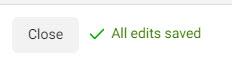
Check the box ‘Run ads on schedule’ and wait until you see the green mark to ensure all edits are saved. Then click ‘Next’.
Setting up an Ad Set
Finding the Ad Set Dashboard
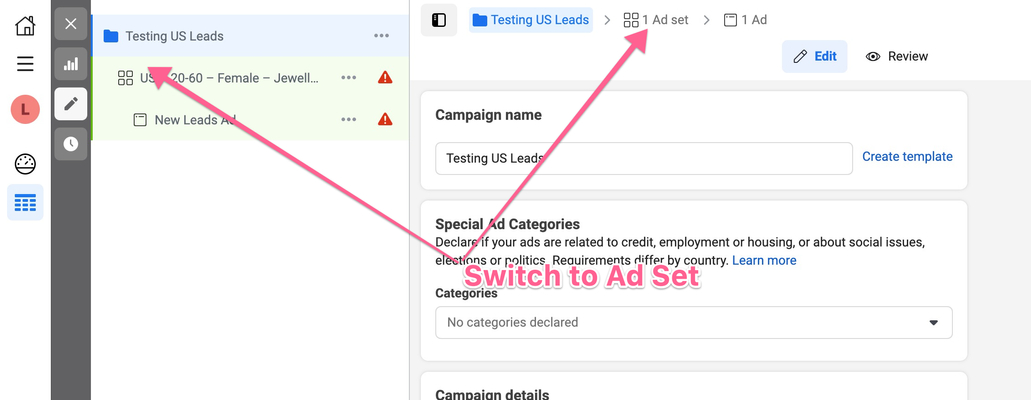
If you’re at the ‘Campaign’ tab, click the next tab 㗊 beside the Campaign tab or below the Campaign at the left panel.
Naming the Ad Set
There are two options in naming your ‘Ad Set.’
Entering the name manually.
Use the template. By choosing this option, the name is auto-generated by Meta as you decide the variables for the settings. We recommend in this format ‘Country – Age Group – Gender – Interest.

Setting up Conversion
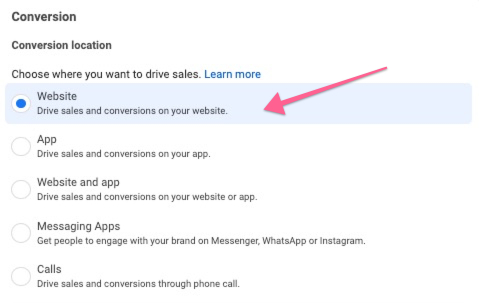
Under ‘Conversion location,’ we will choose the ‘Website’ for this task. You can also refer here for more information about other locations.
Under ‘Performance goal’, the default setting is ‘Maximize the number of conversions’.
You can select other goals by clicking on the drop-down arrow at ‘Other goals’.
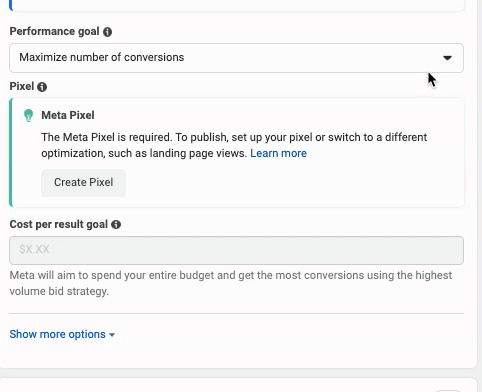
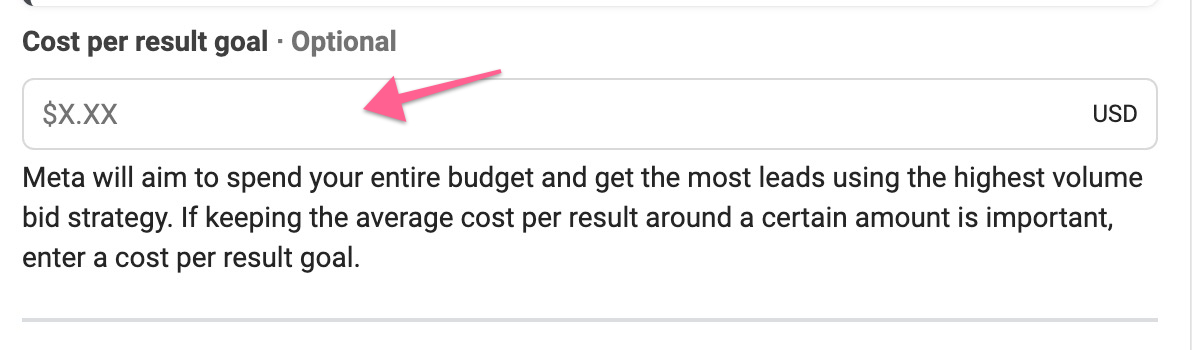
Under ‘Cost per result goal’, you should enter the amount if you have a certain cost per result to achieve. This is optional, and only appears for certain selected ‘Performance goa’. Scroll down after you’re done.
Setting up Budget & Schedule
Choose your budget settings between the two below.
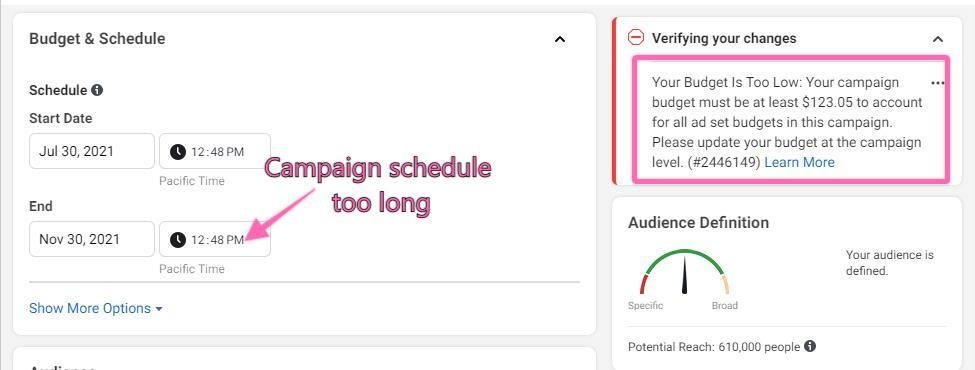
If you are on a Daily Budget, you need to enter your ‘Start Date’, and you can choose to enter your ‘End Date’.
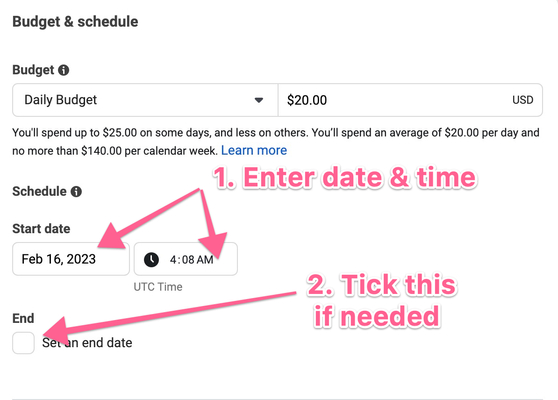
Note: You are collecting leads for an event that will happen in a few days, and it doesn’t make sense to keep your campaign going after the end date.
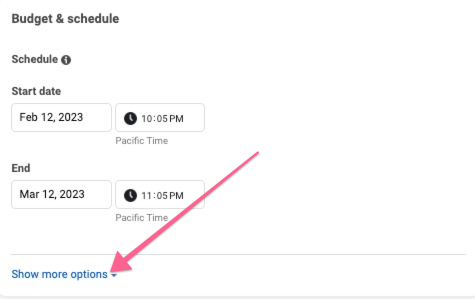
If you are on a Lifetime Budget, you must enter both ‘Start Date’ and ‘End Date’.
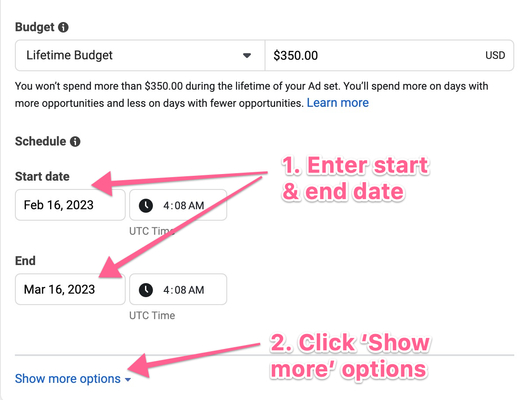
Step 2-4 allows you to set the Ad Spend limit and Scheduling. You can skip to Step 5 if you don’t need it. Otherwise, click ‘Show more options’ to continue.
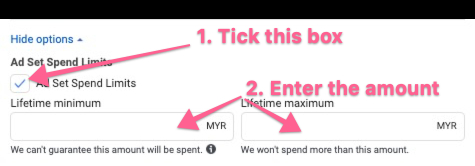
.Tick the ‘Ad Set Spend Limits’ box to set the overall minimum and maximum amount to spend on the Ads.
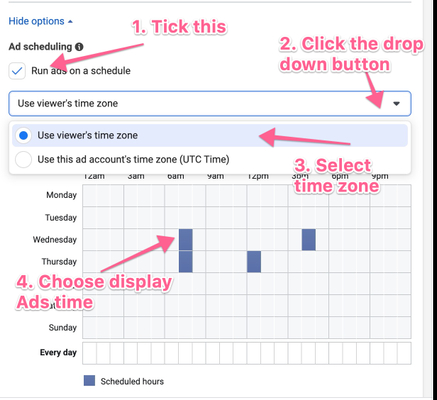
Note: Ad scheduling only appears if you have selected ‘Lifetime budget’ on the Campaigns settings.
You will need to tick the box ‘Run ads on schedule’, then click on the drop-down button to view the time zone options available. After that, just click on the timesheets to schedule the day and time.Take note of errors suggested by Facebook on the right sidebar. For example, if you want to extend your ad schedule to November 2021, you will need to increase your budget.
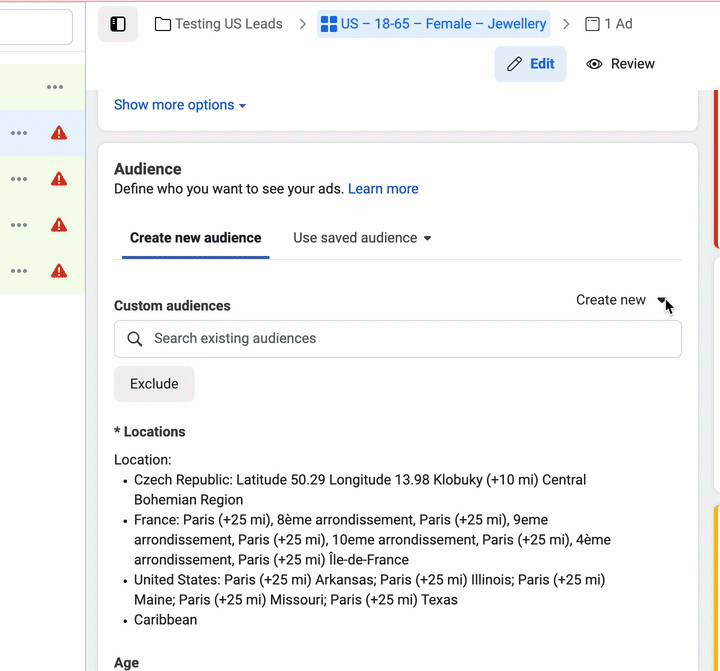
Setting up Audience
Scroll down to 'Audience' on the ‘Ad Set’ setup.
There are few choices to set up the Audience, depending on your targeting strategy and the interaction of your business and people. You can jump to the one you prefer by choosing the following.
Create a new group of the audience regardless of past interaction
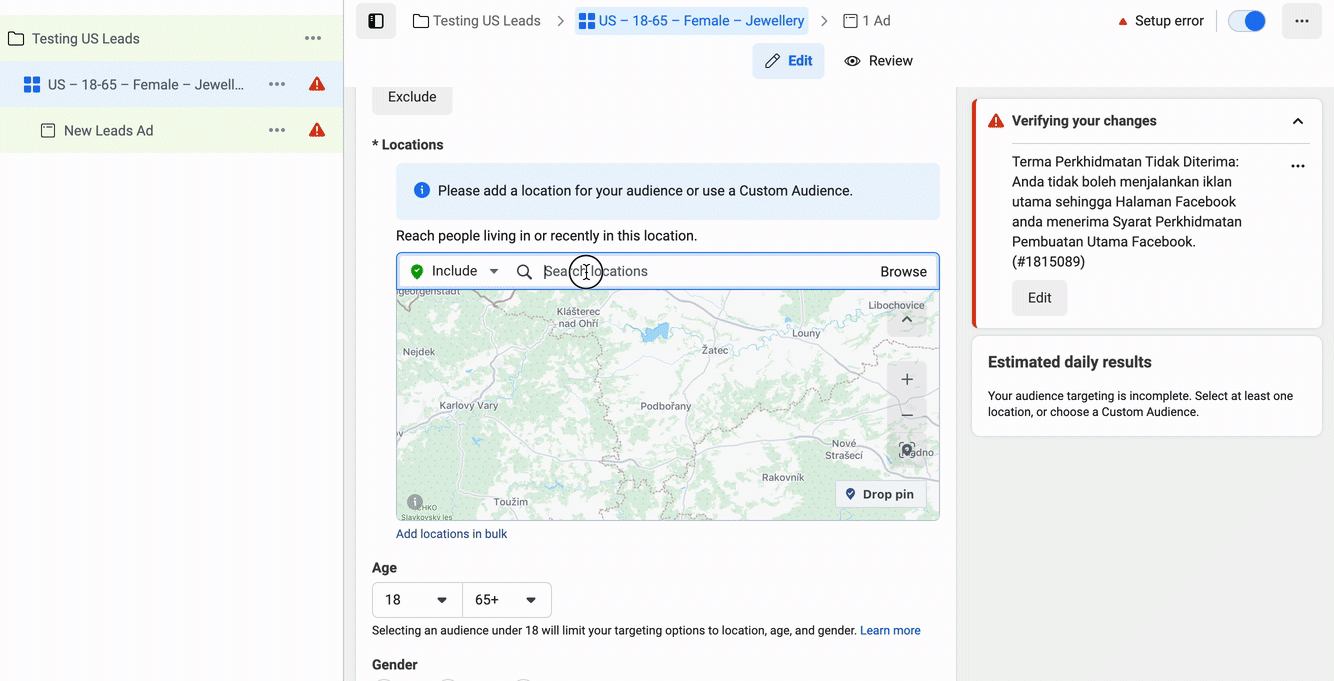
Locations: Select the location settings that match your target audience. You can do it by typing in the location, using ‘Browse’, drop the pin location on the map, and or using the ‘Add bulk location’
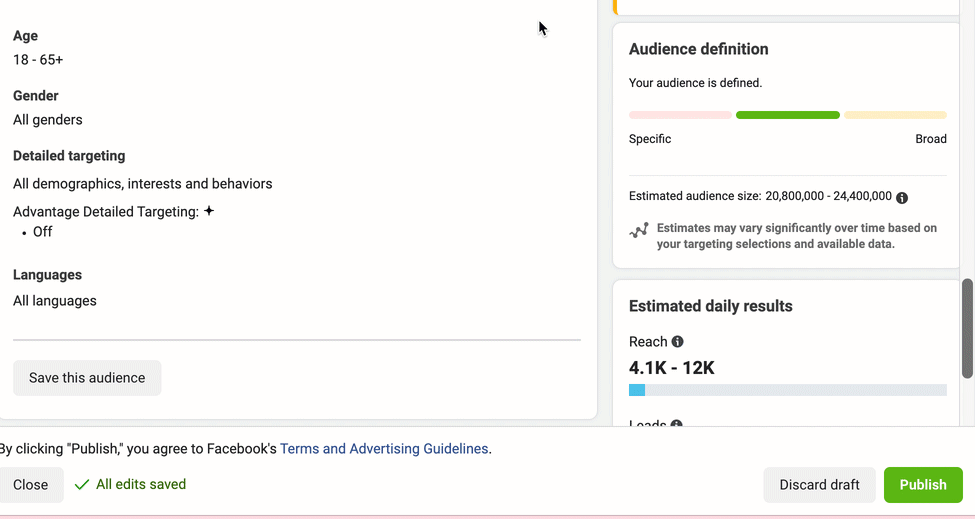
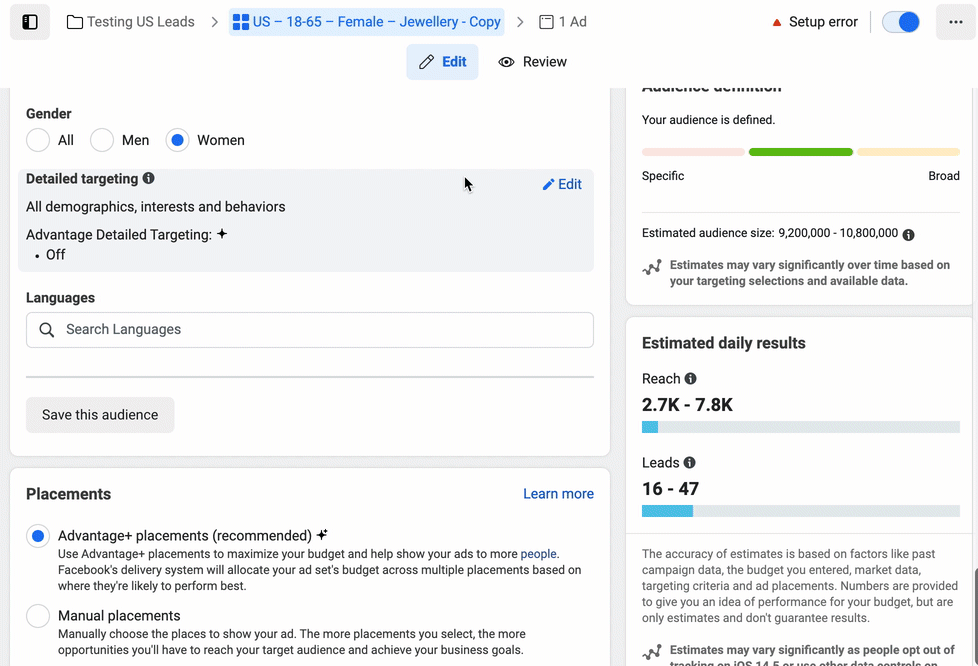
Age, Gender & Language: Select the related group you wish to target by hovering over a hidden ‘Edit’ button on the right and clicking on it. You will see the available choices to choose from there.
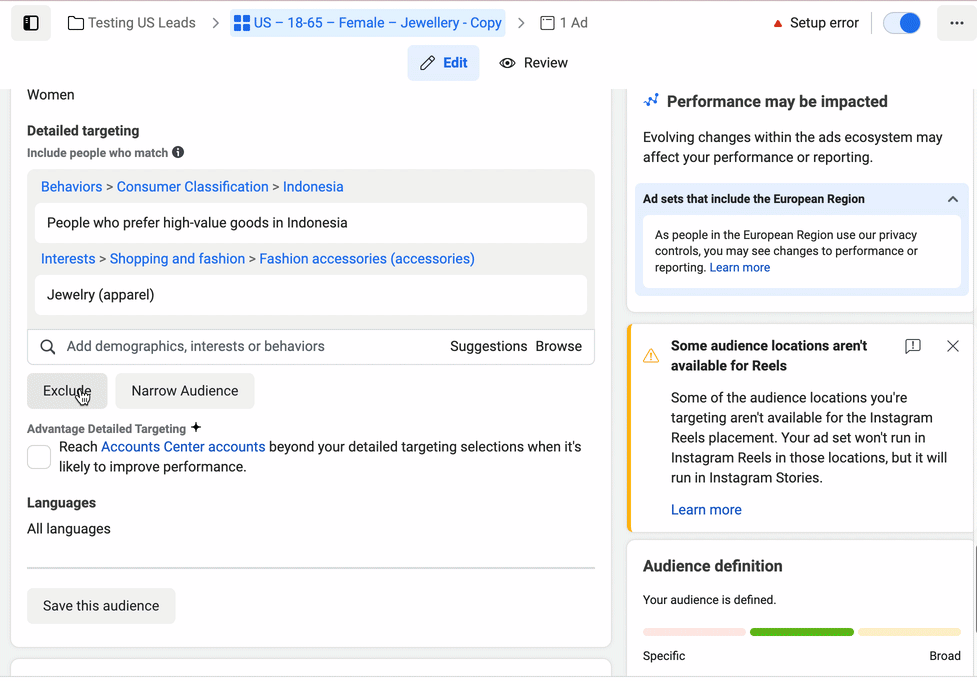
Detailed Targeting: Select the Demographics/Interests/Behaviors that match your target audience. Hover over the hidden ‘Edit’ button on the right and click ‘Browse’ to start selecting.
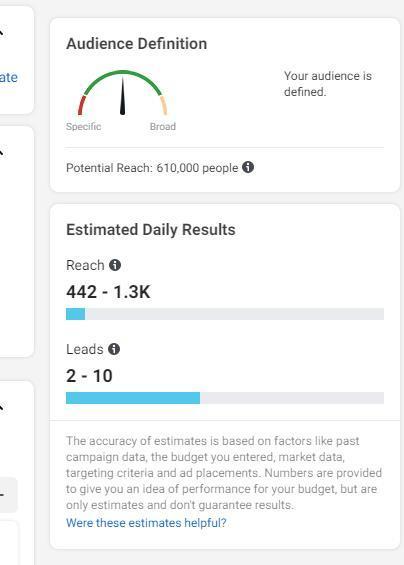
Note: Aim at being specific while not extremely specific. For example, If you are advertising for a golf course, you might want only to pick “Golf” instead of just “Sports” or even tightly related sports. The exception to this case is if your Ad Budget is too big for your audience or if your Audience after your selections is too small. You can always view the Audience reach size on the right panel.
You can continue exploring your audience setup using the ‘Exclude’ and/or ‘Narrow’ features if you like.
Exclude: You can use exclusion groups if you don’t want to target specific groups. For example, you already have another Ad Set targeting that group, or you’ve already tested that group in the past and realized it doesn’t perform well with your offer)
Narrow: You can target specific groups with two matching interests or behaviors. For example, people who love jewelry and luxury bags.
Advantage Detailed Targeting: Check this box if you need Meta’s help to reach out to others who might be interested in your Ads and are not included in your targeting field.
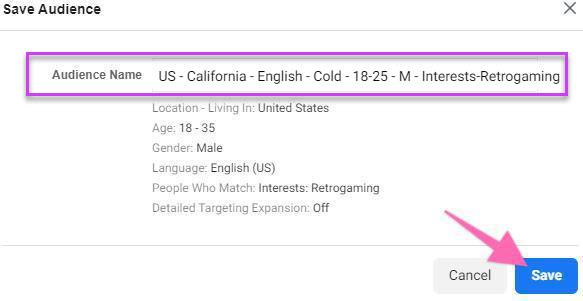
Click ‘Save Audience’ after you’re satisfied with the Audience setup.

You will see the summary of the first ‘Saved Audience’ of the Facebook page. Name it according to your naming convention:
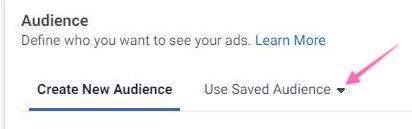
Use saved audience
You can click the ‘Use a Saved Audience’ dropdown to use a previously built audience.
Use custom audience
i. If this is your first time creating, click on ‘Create New’ and choose ‘Custom Audience’. You will see a pop-up with a list of methods for you to select based on the method your customer interacted with you.
ii. If you have created one before, you should be able to search back the custom audience.

Use lookalike audience
Setting up Placements
You can choose between the two below for placing your Ads on Facebook and Instagram.
Note: You can also customize Automatic Placements by clicking “Show More Options”, you might want to start doing so as you optimize your campaign and analyze your results.
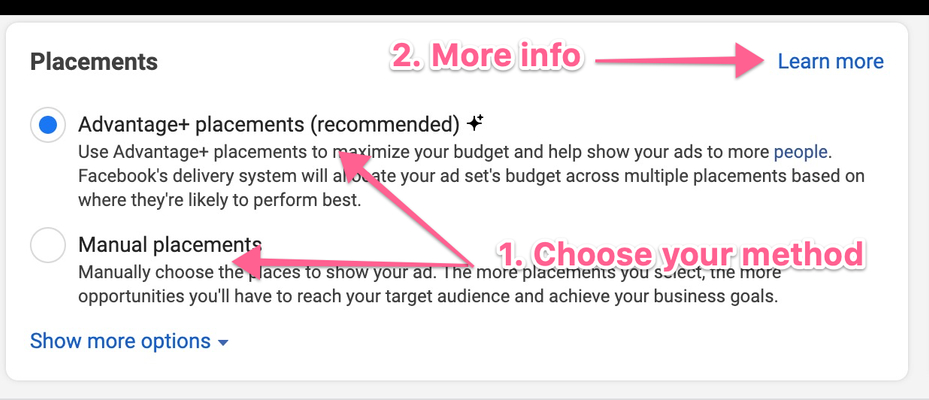
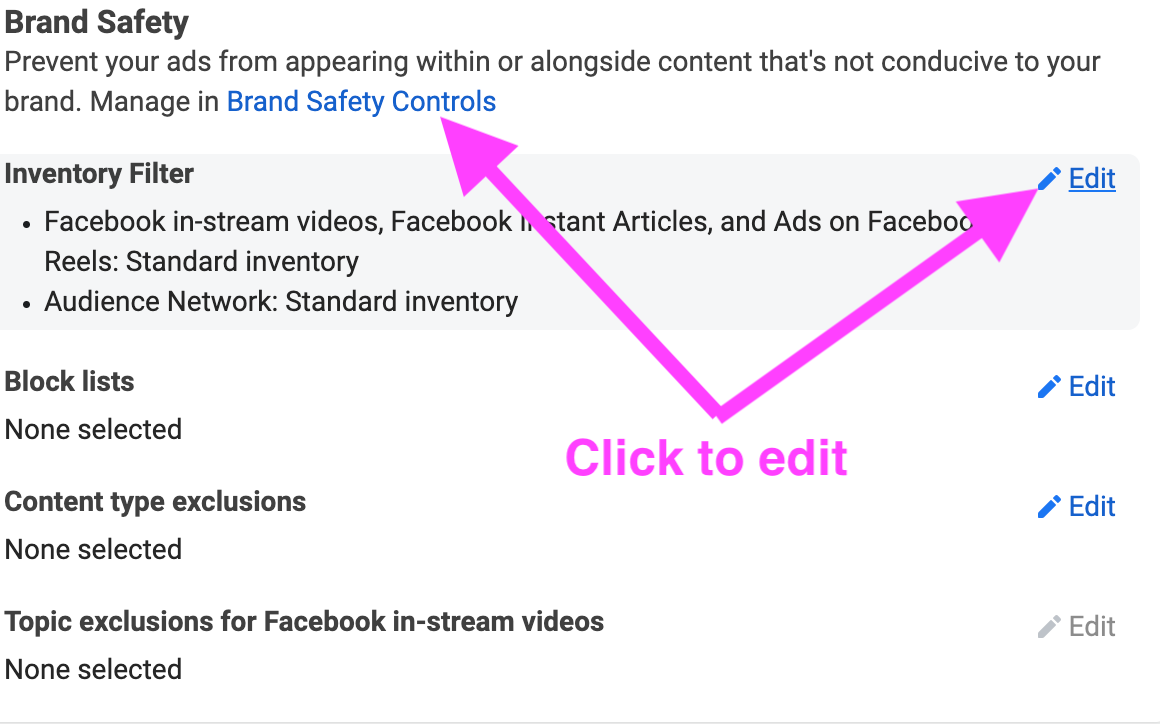
Advantage+ placements (recommended). When you select this option, Meta will automatically place your ads across Facebook, Instagram, Messenger, and the Audience Network when they are likely to get the best results. You can customize more by clicking “Show More Options”. You can set ‘Brand Safety Controls’ to prevent your ads from appearing in content that’s not conducive to your brand. You can set inventory filters, block lists, content type exclusions, and in-stream topic exclusion. You can click the hidden ‘Edit’ pen icon on each ‘control’ or just click ‘Brand Safety Controls’ to manage everything in the ‘Brand Safety’ dashboard.
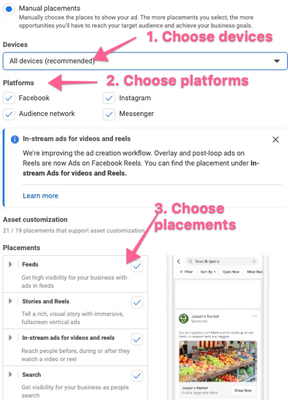
Manual Placements. Choose any selections related to Facebook and Instagram under devices, Platforms, and Placements to display your ad.
All changes made will be automatically saved in drafts, as indicated by the green check bottom left portion of your current dashboard.
Click on ‘Next’ at the bottom right of the page to set up Ads.
Setting up Ads
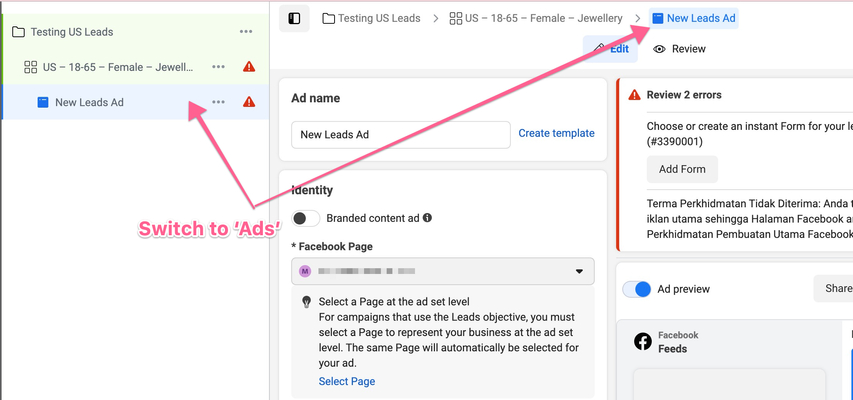
Finding Ad Dashboard
Click the tab ‘New Leads Ad’(default name) beside the Ad Set tab or below the Ad Set at the left panel.
Naming the Ad
You can name your Ads by manually entering the name or using the template.
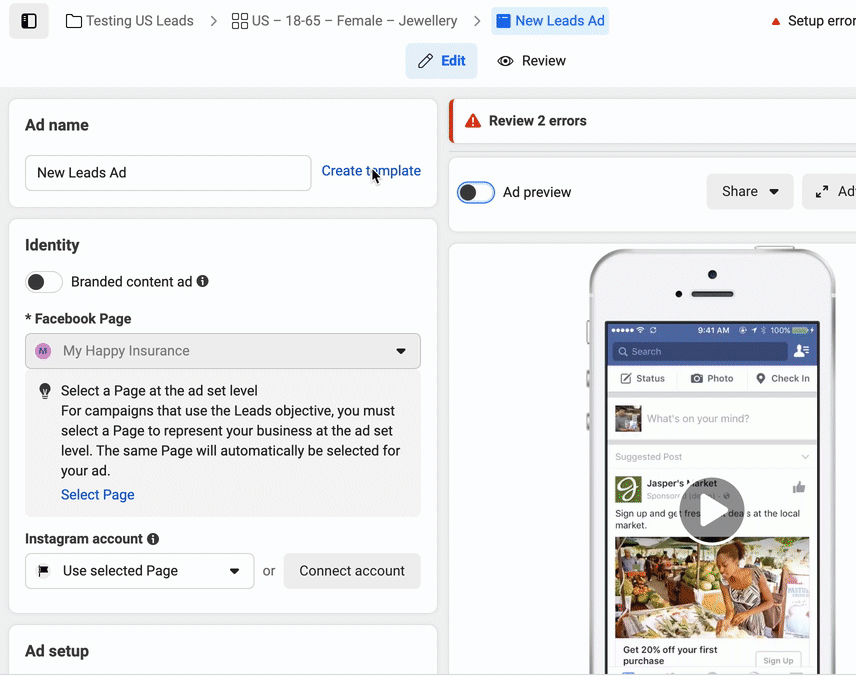
Setting up Identity
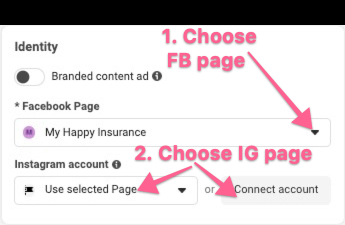
Connect both your Facebook and Instagram pages by choosing the drop-down to select the correct page.
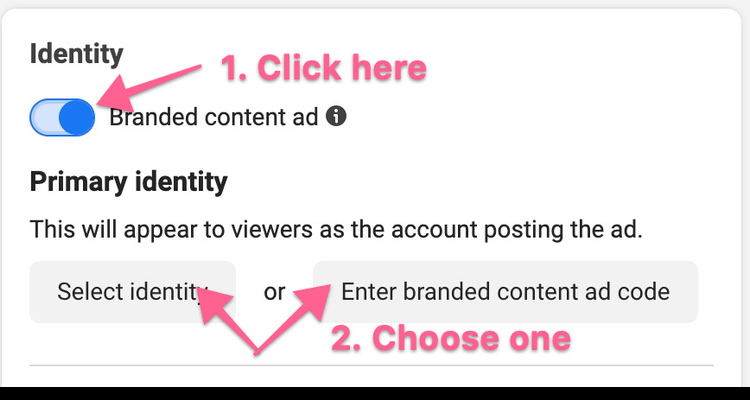
Connecting your account will require the login details.Using Branded Content Ad (optional)
Note: This is only necessary if you partner with another brand and wish to have your Ads appear using their brand.
Switch the button to on until it turns blue, and choose your method to connect with the brand, either by searching their identity or inputting the Ad code provided.
Setting up Ad Format
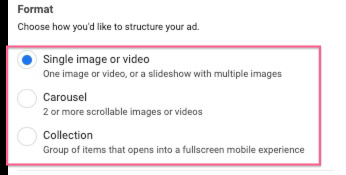
Under ‘Format’, you can scroll down to see that you can choose from three formats: Single Image/Video, Carousel or Collection:
Fulfilling the Ad creative requirements
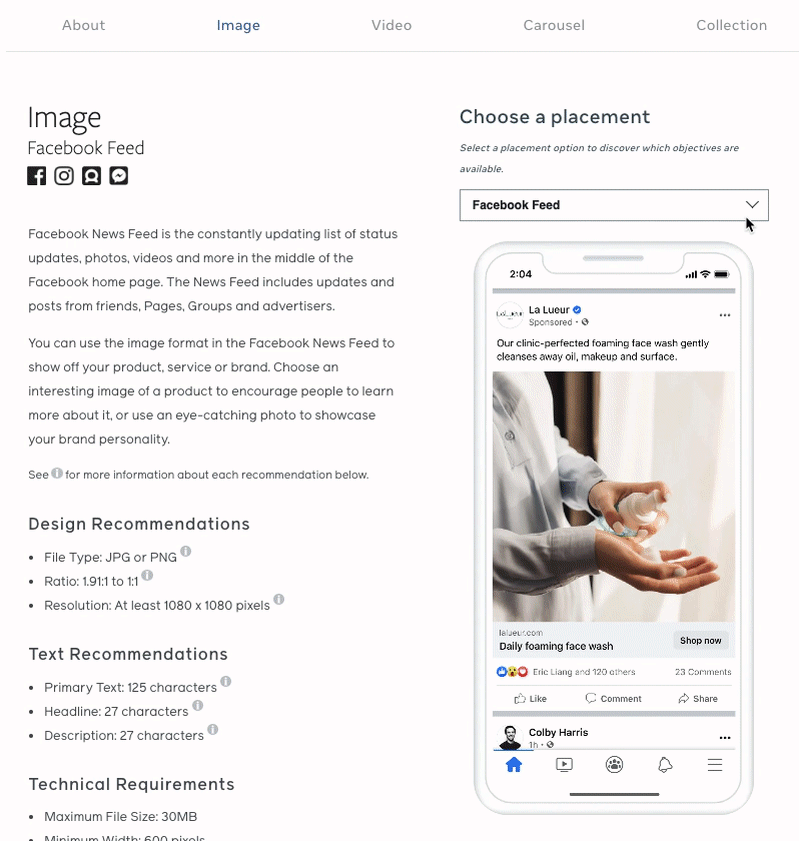
Note: You must create the creatives according to Meta’s requirements for a perfect Ad display. Each Ad requirements are different, depending on the placement and type of media. If you already know this, you can skip to the next section, ‘Setting up Ad creative’.
You can create two types of media on your own Ads: images and videos. We recommend using Meta’s Ads Guide to identify all the requirements accurately. Click here to go to the interactive guide. Under the ‘Image’ tab, hover over to ‘Choose Placements’ at the top right and choose where your image Ad appears. The choices include all placements on Facebook and Instagram. You will see all the requirements appear on the left. You can switch to the ‘Video’ tab above to look for video requirements.
Setting up Ad creative
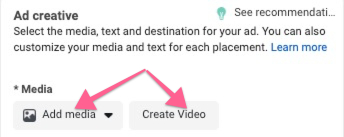
You can add your media by choosing to upload ‘Add Media’ (’image/video) or ‘Create Video’.
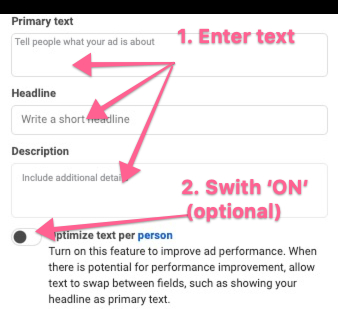
Enter your Ad’s Primary text, Headline, and Description. You can switch ON the ‘Optimize text per person’ button if you wish Meta to swap the texts between the three text fields for auto ad performance.
Select the action button to display on the Ad under ‘Call to Action’. Choose one which encourages your audience to take action upon seeing your ad. Switch on the ‘Ad preview’ if you wish to view the entire Ad layout on the right.
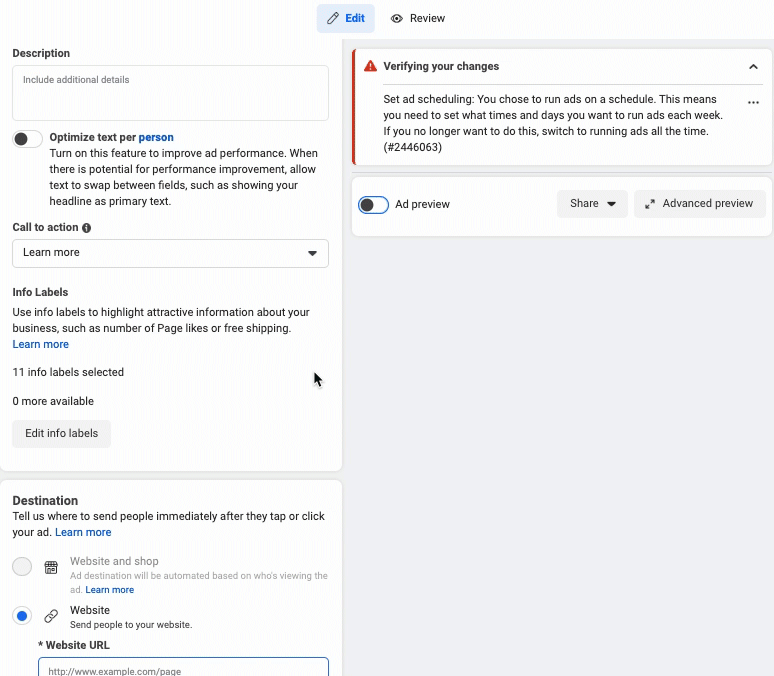
Setting up Destination
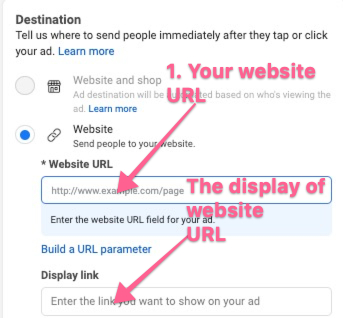
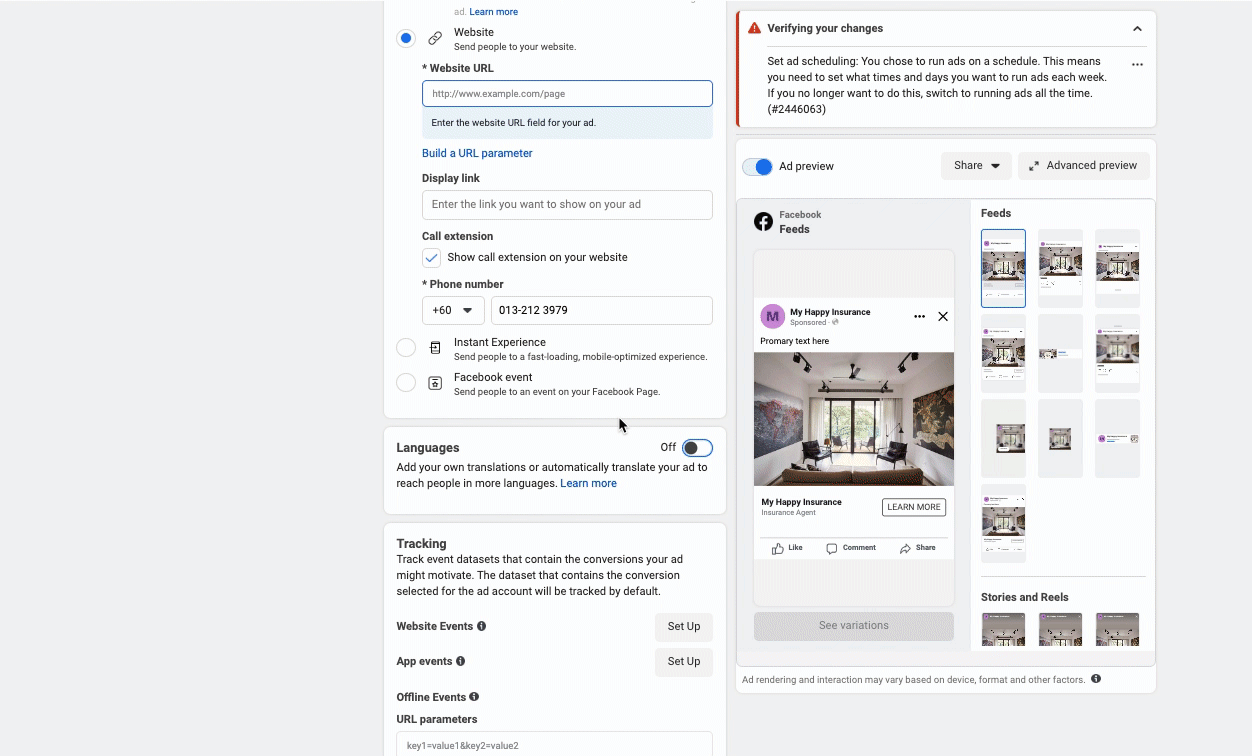
Enter your website’s URL in ‘Website URL’. You can enter a display link, usually shorter if you don’t need to reveal your website URL.
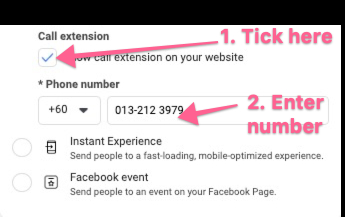
This step is optional. You can include your business phone number by checking the box and then entering your number.
Setting up Language (optional)
You can edit the default and add other languages if needed. Be prepared to do the translations yourself.
Activate your sales campaign
At the top of your dashboard, click on the ‘Review’ tab to review your entire campaign setup.
After you’re satisfied, click ‘Publish’ at the bottom right to submit it for Meta’s review.
That’s it! Your campaign is now being reviewed. To ensure it’s under ‘Review’ status, head back to the Campaign Dashboard by clicking the cross button on the top left panel. You will see your list of campaigns under ‘Campaign’ and its current status under ‘Delivery’.
Instead of appearing as ‘In draft’ under ‘Delivery’, it should appear as ‘In Review’ for a successful submission to Meta.


Note: It may take between 5 min - 48h for your ads to start delivering; when they do, you’ll see an “Active” message instead: